

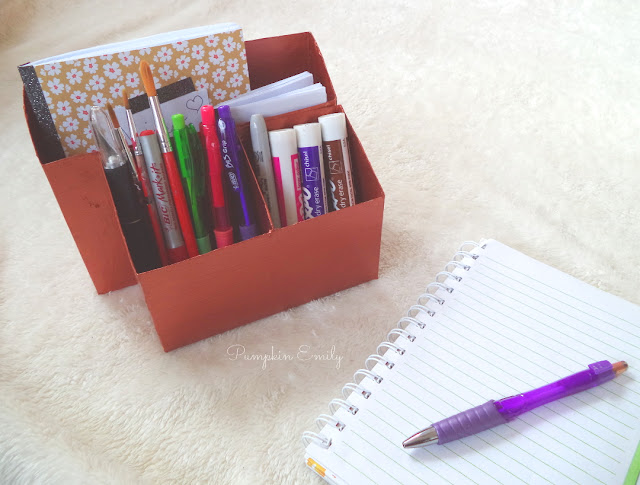
I'm going to show you how to make a organizer out of cereal boxes and it's a copper organizer or you any color you would like to make it. This DIY desk organizer is made out of two cereal boxes and is painted with a few colors of acrylic paint and this DIY copper organizer is a great way to upcycle cereal boxes.
This is one of my favorite organizer ideas and it was pretty easy to make. You can make a bunch of these organizers for your room. I'm probably going to make some more copper DIY ideas!
What you will need for this DIY is two cereal boxes of the same size but if they're two different sizes it will still work, a ruler, scissors, a glue gun, copper or any color of acrylic paint, a pencil, and a paintbrush.

The first thing you want is to take the box that will be in the back and you want to draw a angle on both sides of the box and you can make this any size that you want but remember there's a box that will go in front.
Then you want to draw two lines connecting each point of the angles together on the front and the back of the box and you can use a ruler to make the straight lines.


All you have to do to finish the first box is you want to cut it out.

Now you can make the box the same way as the first box. Just remember you need to make the second box smaller than the first box.

For the divider of the box you want to take the box you just cut out from and you want to cut out the side and match the angle with the angle from the box and trim any of the extra box off so it fits inside of the box.

All you have to do now is put glue on the sides without the angle and put it in the middle of the box. You can also put another divider in there if you want.


All you have to do now is paint the organizer with copper acrylic paint or you can paint it any color that you want.

You want you may have to paint it with more than one coat of paint and you also want to paint all the
sides and inside of the box and when it's dry you can put anything that you want into it.
and that's it! In the comments down below let me know what you think about this organizer.


Post a Comment
Hello! Thanks for your comment! I love to read your comments and I hope you enjoyed reading this post. Make sure to come back to see if I replied back and for new posts. If your comment is spam I'll most likely delete it.