
I'm going to show you how to make patches out of denim fabric, old denim jeans you no longer wear or whatever type of fabric you want to use and these DIY custom patches look really cute and can go onto anything that you want.
After you learn how to make custom embroidered patches, you can make what ever type of patch that you want.
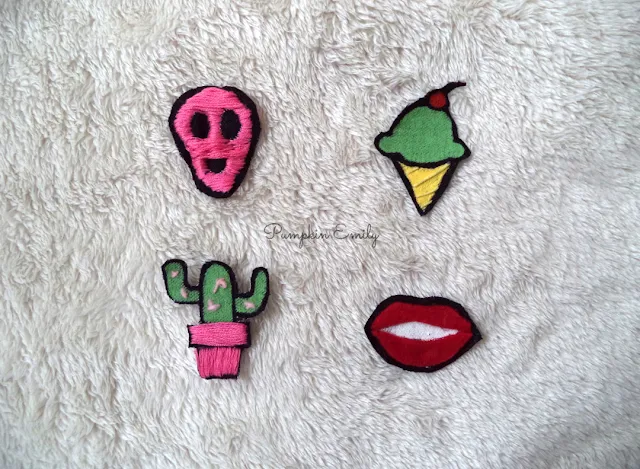
I'll show you how to make a alien patch, then I will show you how to make a ice cream patch, after that I will show you how to make a cactus patch, and a patch that's in a shape of a mouth. You can also make these custom patches any color, shape, size, and you can sew or paint them.
Here's the video version of these DIY patches:
DIY Alien Patch

The first patch I'm going to show you how I made this alien patch.
For this alien patch and all of the other patches you want to find a piece of thick fabric like denim and cut out a piece that's big enough for you to create your patch and then you can draw a alien face or another shape onto the fabric.

After you are done drawing the face you want to draw over the alien face with a permanent marker.

The way how I sewed mine was be starting at one side at the top of the patch inside of the border of the patch and then went to the other side and I continued this all though the patch and I also sewed this way around the eyes. I didn't sew the eyes or the border but you can if you want and don't pull the thread too hard because you can mess up your patch.


DIY Ice Cream Patch

Now I'm going to show you how I made this ice cream patch.
The first thing you want to do is draw out your ice cream patch onto a thick fabric like denim and then draw over it again with a permanent marker.

Now you can paint it any color that you want. I took the colors blue and yellow to create a mint color and then I mixed with a textile medium because I was using acrylic paint. I did use acrylic paint but if you are going to wash your patches use fabric paint instead.
If you use acrylic paint by itself it probably will wash off after a couple of washes so you want to mix the acrylic paint with a textile medium and follow the directions or you can just use fabric paint. If you have any questions about this let me know or you can search more about it.

Then you can paint in the colors of your patch and wait for it to dry.
Once it's dry you want to put some thread of same color as the cone on a needle and sew a pattern of a cone or any type of pattern that you want onto the cone. I used the same technique as the alien but I spaced out the thread.

If you got paint on the border of the patch you can clean up the patch with the permanent marker and cut it out and then you want to clean up the borders and the sides of the patch again with a permanent marker.

DIY Cactus Patch

Now I'm going to show you I made this cactus patch.
So now you want to draw your the shape of a cactus and the pot that it would be sitting in or you can draw another shape with a pencil and then you want to draw over the shapes with a permanent marker.

Then you can paint the cactus and if you want you can sew the pot the cactus is in.

I sewed the top part of the pot left to right and the bottom part of the pot top to bottom and I sewed it the same way as the alien.

For the spines of the cactus I separated yarn to one strand of yarn and threaded some yarn onto a yarn needle and made X's on the cactus. Something that you should know is that the paint does break so make sure you don't make too many holes in the patch.


All you have to do now is cut the patch out and clean up the border with a permanent marker.

DIY Mouth Embroidered Patch
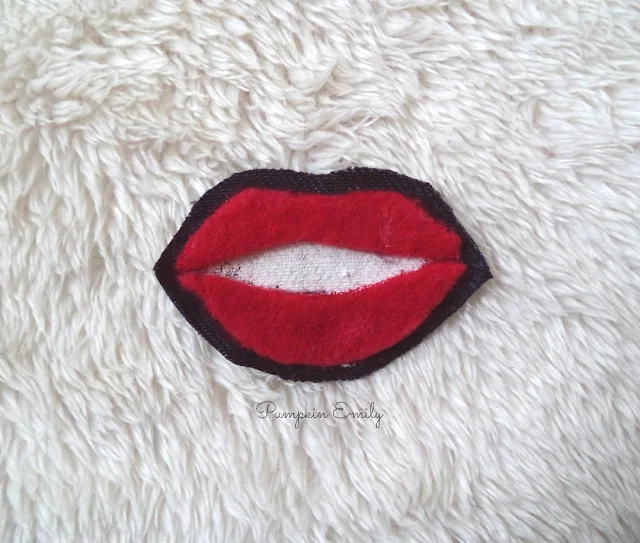
For the final patch I'm going to show you how to make this mouth patch.
The first thing you want to do is to draw and cut out the top and the bottom of the lips from felt.

Then you want to layout the lips onto the denim to see where the inside of the mouth is and then you want to paint where the inside of the mouth will be any color that you want.

Now you want to glue the lips on with fabric glue or tacky glue and then you can draw a border around the mouth with the permanent marker.


All you have to do to finish this patch is to cut it out and clean up the border with a permanent marker.


Question Time + How to Attach Embroidered Patches!
How To Attach These Patches
You can attach all these patches by sewing them onto whatever you would like and you can also sew around each patch with any type of stitching.


Post a Comment
Hello! Thanks for your comment! I love to read your comments and I hope you enjoyed reading this post. Make sure to come back to see if I replied back and for new posts. If your comment is spam I'll most likely delete it.