

Which watercolor bookmark is your favorite? Mine is the sky bookmark. I think it looks cute.
You can watch the video to learn how to make these here:
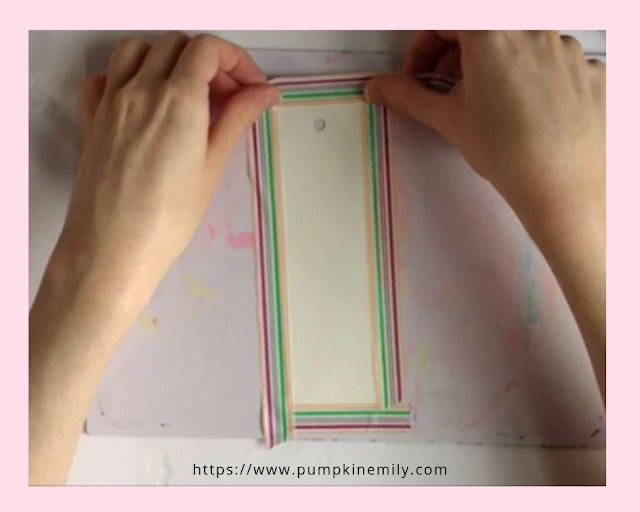
How To Cut Out The Bookmark
For all of these bookmarks you want to cut the bookmark out of watercolor paper. I made my bookmarks to be 6 in x 2 in or 15 cm x 5 cm.
If you want to add ribbon or something else on the bookmark you want to put a hole with a hole puncher.
Then you want to tape down the bookmark and then you can start painting.
When you're done painting wait for it to dry.
When it's dry you can slowly pull the tape off of the bookmark.
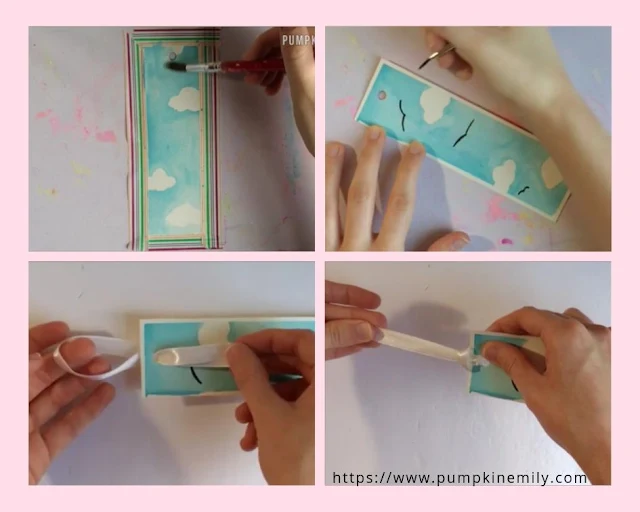
Sky Watercolor Bookmark

1. Paint the outline of the clouds with a light blue.
2. Paint around the clouds and once you're painting wait for it to dry.
3. When the paint is dry you want to slowly pull the tape off of the bookmark.
4. For the birds you can take a thin paintbrush and black watercolor paint and you want to paint birds onto the sky.
The birds I made are two curves connected together but you can make any bird you want. You can make small and big birds. The larger birds are closer and the smaller birds are farther away.
5. Once you like how the bookmark looks wait for it to dry.
6. If you put a hole in the bookmark you want to take a piece of ribbon and fold it in half so you create a loop. Then you want to run the ribbon through the hole of the front of the bookmark and then you can run the ends of the ribbon though the loop and you're done.
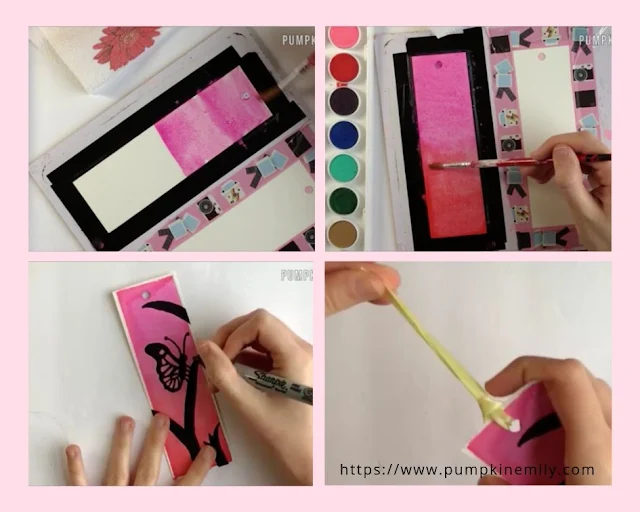
Ombre Watercolor Bookmark

1. Start with one color on one paintbrush and paint one end of the bookmark.
2. Take another paintbrush and another color and paint the other end with that new color.
3. When you get to the middle you want to blend the colors in so it's looks like a gradient.
4. Once you like how the bookmark looks you want to wait for the paint to dry.
5. When the paint is dry you want to take the tape off of the bookmark.
6. Take a pencil and draw a silhouette of anything that you want. I drew a butterfly and later i drew some leaves.
To make things easier you can search for a picture on the internet to go off of and you do want to try to avoid erasing anything because the paint can come off.
7. When you're done drawing your design you want to go over it with a permanent marker.
8. If you put a hole in the bookmark you're going to follow the same steps as the first bookmark which is you want to take a piece of ribbon and fold it in half and then you want to run the ribbon through the hole of the bookmark and run the ends of the ribbon though the loop.
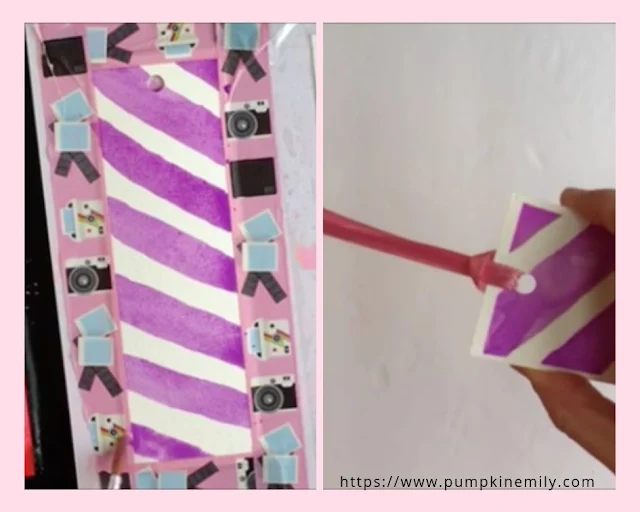
Striped Bookmark

1. Paint stripes onto the bookmark. You can make the stripes any size and you can also use tape to separate the lines but I decided to paint the stripes on without tape.
When I was done with the stripes I went back and fixed the stripes so they would look better.
Then I waited for the bookmark to dry.
2. When dry you can take some ribbon and fold it half and then you can run the ribbon through the bookmark and pull the ends of the ribbon thought the loop.
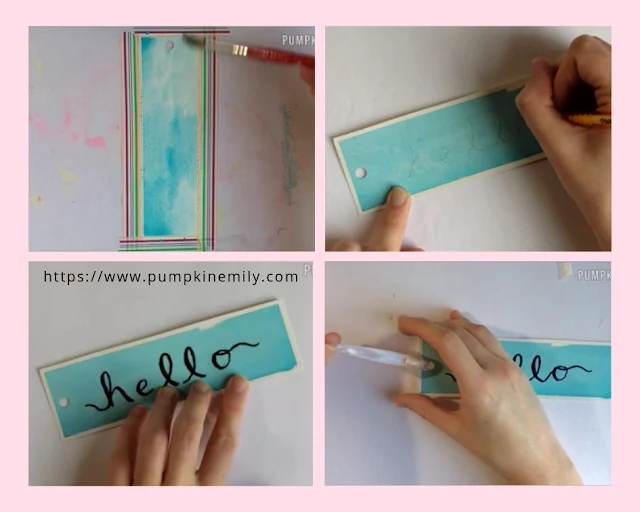
Quote Watercolor Bookmark

1. Paint the bookmark any color that you want.
2. When the bookmark is dry you want to take a pencil and write a word or a quote onto the bookmark. I wrote the word hello.
3. After you're done writing the word or quote you can go over it with a permanent marker or with watercolor or acrylic paint.
4. Then you can take some ribbon and fold it half and then you can run the ribbon through the bookmark and pull the ends of the ribbon thought the loop and you're all done.
and that's it how you make all of these watercolor bookmarks! Bye!


Post a Comment
Hello! Thanks for your comment! I love to read your comments and I hope you enjoyed reading this post. Make sure to come back to see if I replied back and for new posts. If your comment is spam I'll most likely delete it.