

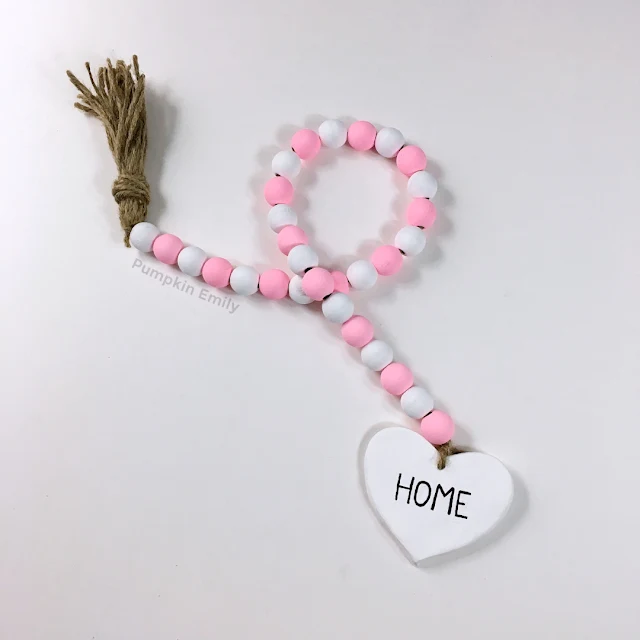
Hello! In the blog post and in the video you get to learn how to make a wooden bead garland. This farmhouse wooden bead garland can be made with a tassel and a clay heart or you can make it with two tassels. This garland make a cute spring farmhouse room decoration for any room.
What do you think about this wooden bead garland?
You watch the video here:
You will need:
Wooden beads of any sizePaint
Paintbrush
Twine
Air Dry Clay
Toothpick
Pencil
Plastic wrap
The Beads
1. Paint your wooden beads. You can use any size and as many beads as you want and you can also paint them any color that you want. I painted mine pink and white and I painted fifthteen of each color.
It is easier to stick the wooden beads on a barbecue stick or something else to paint them and when they're dry you can put them in a bowl.
2. Put the beads onto the twine. I did a pink and white pattern. If I needed to I did use a toothpick to push the twine through the beads.

The Tassel
1. Make the tassel. You want to to start off by wrapping some twine around your fingers about twenty or more times.
2. Take the twine off of your hand.
3. Cut another piece of twine and you want to tie this piece though the loop.
4. Take another piece of twine that's long and make a loop over the tassel.
5. Wrap the twine around the loop and the twine.

6. Take the end that you were wrapping with and put it through the loop and then you want to pull the piece that is connected to the loop while holding the one strand that you were wrapping with.

7. Cut off the extra twine from the loop and the piece you were just wrapping with.
8. To finish off the tassel, you want to cut the loop at the bottom of the tassel and then you want to trim the bottom of the tassel.

9. Tie the two strands at the top of the tassel to the string on the garland once and then you can tie one of the strands from the tassel to the string from the garland into a knot.
10. You can cut off the extra twine from the pieces that you were wrapping with.


The Clay Heart
1. Take a ball of air dry clay and roll it out between two pieces of parchment paper or you can just roll it out on top of one piece of parchment paper.

2. Put a heart or another shaped cookie cutter on the clay and press down.
3. Take your shape out of clay and the cookie cutter. You can use a x-acto knife to help you get the shape off of the cookie cutter.

4. Use a toothpick to make a hole that's big enough for the twine to go through.
5. Smooth out the clay with water.
6. Carefully move the heart onto a piece of plastic wrap to dry and if you need to you can smooth out the back of the clay and then you can lay it down to dry. Follow the clays instructions to see how long it will take to dry.

7. Paint it any color that you want or you can leave it how it is. I painted mine white because it was to grey.
8. Write any word on the clay with a pencil. I wrote the word home.
9. Paint on the word with a paintbrush or you can use a pencil as paintbrush.

10. When the paint is dry you can pull the other end of the twine that's on the garland through the front of the heart and then you can tie the twine in a knot and cut off the extra twine. You're all done.


That's how you make a wooden bead garland! I love how it came out.


Post a Comment
Hello! Thanks for your comment! I love to read your comments and I hope you enjoyed reading this post. Make sure to come back to see if I replied back and for new posts. If your comment is spam I'll most likely delete it.