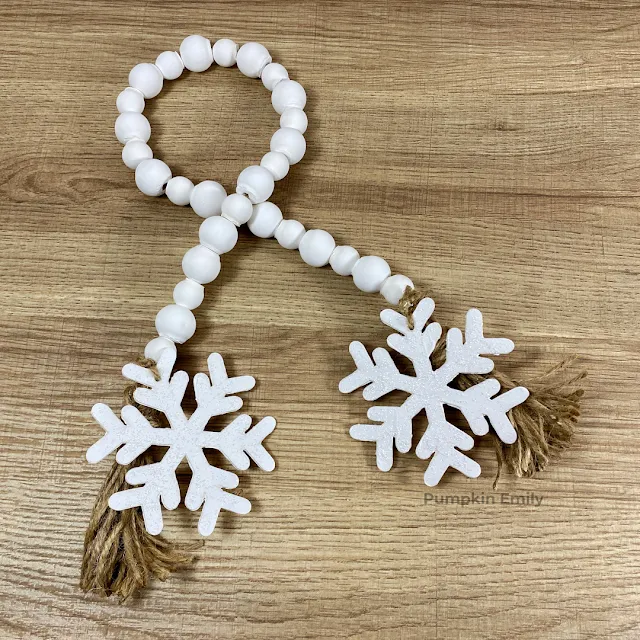
Hey there! I wanted to make a wood bead garland for winter so I grabbed two different shaped beads, twine, and I also had some wooden snowflakes that I thought would go perfect for it.
I found that it was really easy to make and you can definitely customize it to your liking.
For instance, you can paint the beads any color that you would like or you can one to two snowflakes or tassels. I decided to add two snowflakes and two tassels because that's what I like the best. I also painted the beads and snowflakes white.
Now if you want to learn how to make this garland you can read on or you can watch the video below. This garland is first DIY in the video.
What you're going to need:
Wood beads
Twine
Wood snowflakes
Acrylic paint
Paintbrush
Tinfoil
Paper plate or bowl
Spoon
Pencil
Water
Scissors
Cardboard
Optional: Fine glitter, tape, and hot glue
How To Paint The Snowflakes
The first thing you want to do is that you want to paint your snowflakes. What you're going to need for these steps is wood snowflakes, white acrylic paint, and a paintbrush. Also if you want to make your snowflakes sparkly, you want fine glitter that's the same color as the paint.
1. The first step you want to start doing is that you want to paint one or two wooden snowflakes with white acrylic paint.
2. Then you want to sprinkle some fine glitter on the wet paint or you can go onto step 3. You want to make sure the paint is still wet when you do this because that's the key for it to stay on. Some of the glitter may still come off later but most of it should still stay on it.
Note: If you're worried the glitter will come off you can cover it with a coat of Mod Podge.
3. Once you're done sprinkling on the glitter you want to let everything dry and if you want you can also paint the backs of the snowflakes but you don't have to.

How To Paint The Wood Beads
Now while you wait for the snowflakes to dry, you can paint the beads or if you don't want to paint your beads you skip this step and make the tassels.
What you're going to need for this step is wood beads of one or more sizes, acrylic paint, water, paper plate or bowl, pencil, and tin foil.
3. When you're done painting one bead, you can pick it up with a spoon and a pencil.
4. Then you want to move the bead on a piece of tin foil with one of the holes of the bead facing up.
5. When you're done with one bead, you can do the same steps with the other beads and then you want to let them dry completely before putting them all together on a piece of twine.

How To Make The Tassels
To start making the tassels, you're going to need twine, scissors, and a piece of cardboard that's the length that you want your tassel to be.

3. Then you can tie another piece of twine where you want the top of the tassel to be into a knot.
4. Once you're done, you want to make another piece of twine into a loop.
5. Then you want to place the loop over the tassel and wrap the longest part of the twine around the tassel about 10 times.
6. When you're done wrapping the twine around the tassel, you want to cut the twine you were wrapping with.
7. Then you want to pull the twine you just cut through the loop and then you can pull the other end of the loop to make a knot.

8. When you're done, you can cut off the excess twine but not to short because it may come undone and then you can make a second tassel.

How To Put The Garland Together
1. You want to start by putting your beads onto a new piece of twine.
If you want to make things easier with pulling the twine through the beads, you can put tape on the end of the twine. Also if the holes of the beads are closed with paint, you can try poking the hole with a pencil to move the paint.


5. Repeat step 4 for the other snowflake.

6. Now when you're done tying everything on, you can trim off the extra twine but not to short because the knots may come undone but if you think the twine may come undone you can put a tiny drop of hot glue on each knot to keep it in place.

Final Thoughts
That's how I made this really cute snowflake wood bead garland!
Here's what it looks like below.

Now here's what the snowflakes and the tassels look close up. I know it's a little hard to see the glitter but in real life the snowflakes look sparkly and they kind of look like how real snow looks like.

I absolutely love how this garland turned out! I think it looks really cute and pretty. My favorite thing about it is the snowflakes. They look pretty.
What do you think about this DIY and what's your favorite thing about it?


Post a Comment
Hello! Thanks for your comment! I love to read your comments and I hope you enjoyed reading this post. Make sure to come back to see if I replied back and for new posts. If your comment is spam I'll most likely delete it.