

Hello! In this post, I'm going to be showing you how to make your own watercolor Polaroid paintings. I'll also be showing you how to make three easy ideas you can paint in the frame.
You can either watch the video here or you can continue reading on.
You will need:
Watercolor Paint
Watercolor Paper
Paintbrushes
Water
Pencil
Pen
Ruler
Tape
Something to tape your painting on like a board.
The Creation of the Polaroid
1. You want to start off by drawing and measuring out how big you want your polaroid to be on watercolor paper and cut it out. The size of my polaroid is 4 x 3 inches.
2. When you're done cutting out your polaroid you want to draw the place where the paint will be going which is the frame. The measurements I used are 1 inch from the bottom and 3/16 of a inch from all three of the sides.
If you want to make more Polaroids you can trace them and if your watercolor paper is thin enough you should be able to trace the first Polaroid so you don't have to measure the it again.
3. When you're done creating the frame, you want tape off the square or you can draw on the polaroid first and then you can put tape on it. I used washi tape but you can use whatever tape you would like but make sure the tape comes off of the paper and doesn't ruin it or the painting.
When you're done taping the paper down, you can paint whatever you would like.

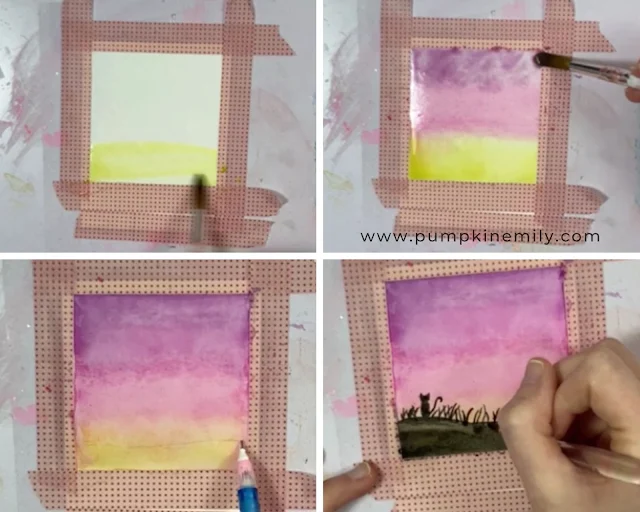
Cat Watching the Sunset in a Field

1. You want to start off by making the sunset first and you want to start from the lightest color. I started painting with the color yellow at the bottom and then I went to pink in the middle and purple on the top. I also blended these colors in so there was a pretty transition in between each color.
2. When the sky was dry you want to draw where you want a hill to be and then you want to paint it black.
3. After you're done painting the hill, you can paint a cat and some tall grass using a thin paintbrush.
4. When the paint is completely dry, you can carefully pull off the tape.
6. When you're completely done with your painting and if you see any pencil markings around the border of the frame you can erase them.
7. Also when the polaroid is dry and if the it's not flat you can place something over it like a book for a few hours or days so it can flatten out but it may not flatten out completely. It will just look better.
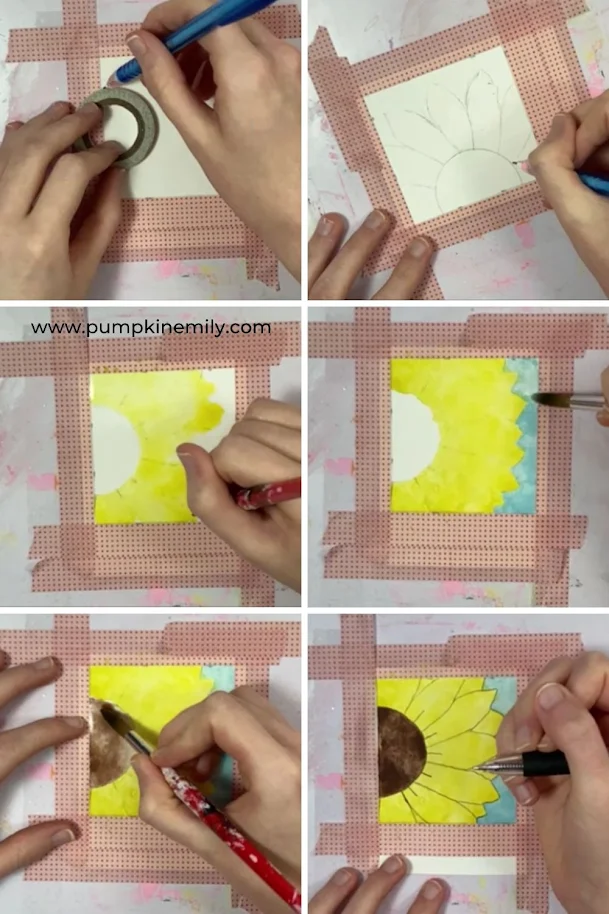
Sunflower

1. The first thing you want to do is that you want to make a circle to make the middle of the flower. I traced washi tape on the left side of the polaroid to create the middle of the flower.
2. Then you want to draw the petals of the flower around the circle.
3. Before I started to paint anything, I did partially erase the lines but I kept them to where I could still see them and this will help so the lines won't be too dark underneath of the paint. You don't have to do this it's an optional step you can do.
4. Once you like how your sunflower drawing looks, you can paint the sunflower. I painted the sunflower a bright yellow.
5. When the sunflower is dry, you want to paint the sky blue or another color.
6. After you're done painting the sky and while it dries, you can paint the middle of the sunflower brown.
7. When the painting is completely dry, you want to outline the sunflower . If you want you can also give some draw one line next the middle of flower on each petal to give the petals some detail.
8. When you're completely done with your painting you can pull off the tape and erase any pencil markings around the border of the frame.
9. Just like the first Polaroid and after the painting is dry, you can place something over it to flatten it for a few hours or days so the paper isn't warped but it may not flatten out completely. It will just look better than what it looked like before.
Moon

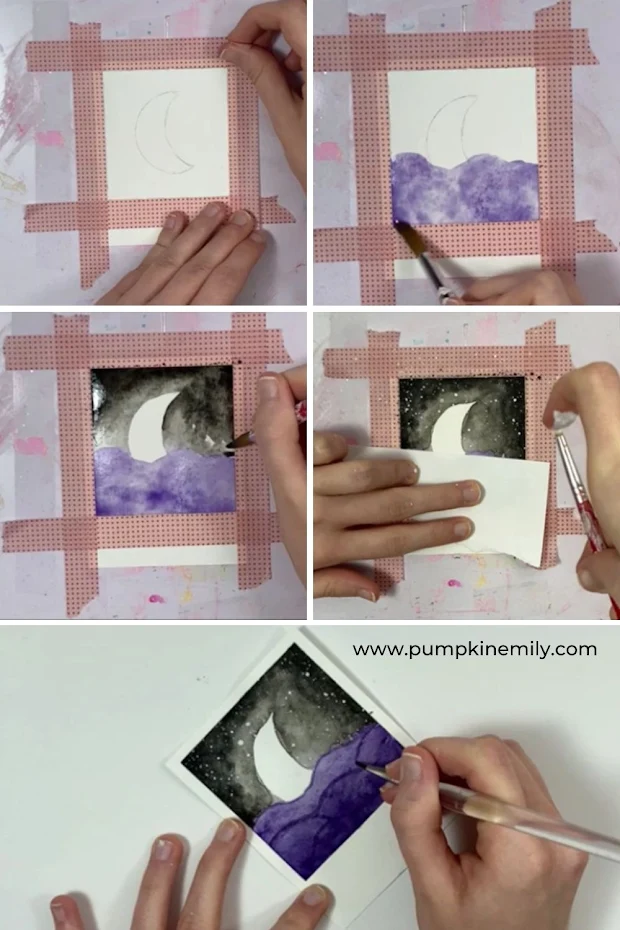
1. You want to draw either a crescent moon or a full moon in the middle. I traced half of a roll of washi tape and then I drew a curved line to create a crescent moon. When I was done drawing the moon, I taped the Polaroid down.
2. Then I erased half of the moon so I drew a place where the clouds could go.
3. For your painting you can start painting whatever you would like it just depends what colors you're using. You want to start from light color and then you want to go to dark colors. I started to paint the clouds a dark purple.
4. When the clouds were dry, you want to paint your sky any color that you want. I painted the sky black and the closer I got to the moon I made the black lighter.
5. When you're painting was dry, you can create some stars. You can do this by watering down some white acrylic paint and flick the bristles of a paintbrush towards the sky with your your finger. I also covered the clouds with a scrap piece of paper so the paint doesn't get on the clouds.
6. The last thing I painted was the clouds. I outlined the clouds with a darker purple to make the clouds in the front stand out more.
7. The last thing you can do is that you can erase any pencil markings and then you're all done.
8. Just like the other polaroids and when the painting is dry you can put something over it for a few hours so it doesn't become as warped and probably won't flatten out completely. It will just look better.
That's how you make all of these pretty Polaroid paintings. I love how all of them turned out. My favorite is the one with the cat sitting in a field at sunset. Which one is your favorite?


1 comment
Thank you, you have made these seem so easy to do I will actually have a go! xx
ReplyDeleteHello! Thanks for your comment! I love to read your comments and I hope you enjoyed reading this post. Make sure to come back to see if I replied back and for new posts. If your comment is spam I'll most likely delete it.