

Hey there! I made a woven wall hanging out of yarn last year and I finally edited everything to show you how to make it. I'll be showing you how to make the woven wall hanging that's in the first picture and a cardboard loom.
You can make it any color and design that you want. You can also do any type of weaving styles you would like. I just did a basic weave through out the whole wall hanging.
Also you can sew some sequins on it too! I put some tiny sequins on mine but this is a optional step.
To learn how to make it you can watch the video below or you can read on.
What you're going to need:
Cardboard
A few colors and types of yarn
Tape
Wooden dowel
Pencil
Ruler
Scissors
Optional: A needle, thread, and sequins.
Making The Loom
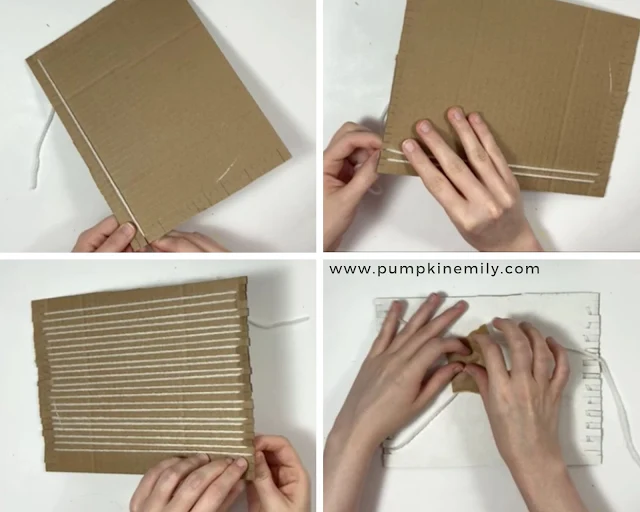
1. To make the loom, you want to start by measuring out a piece of cardboard that's the shape of a rectangle and larger than what you want your wall hanging to be. My piece of cardboard measures to be about 9 x 7 inches.
2. Cut off the cardboard you don't need.
3. When you're done cutting it out, you want to cut out two more pieces of cardboard.
The first piece of cardboard I cut out measured about 8 x 1 inches and the other measured about 8 x 1/2 inches. If the loom is larger than what mine is you're going to want to make these two pieces larger. Check step one to see the size of the loom that I made.

4. Take a ruler, a pencil and your loom and make some marks with your pencil that measure a 1/4 inch apart on both of the shortest ends of the cardboard.
5. When you're done, you want to cut about a 1/2 inch down on each mark.

Putting Yarn On The Loom
6. When you're done cutting each mark, you want to take a piece of yarn and wrap it around each mark by putting the end of the yarn in the first mark. Make sure you leave some extra hanging off because you're going to tape it to the back later.
7. Move the yarn to the opposite cut and wrap it around pulling it back up to the next cut. You want to repeat these steps until you're done and make sure you have a even amount of yarn on the loom when you're done.
I did skip the first mark and two on the end because the cardboard was too thin and I needed a even amount of yarn on the loom. You can do this to if you need too.
8. When you're done, you want to tape the yarn on the back of the cardboard.
Getting Ready To Weave
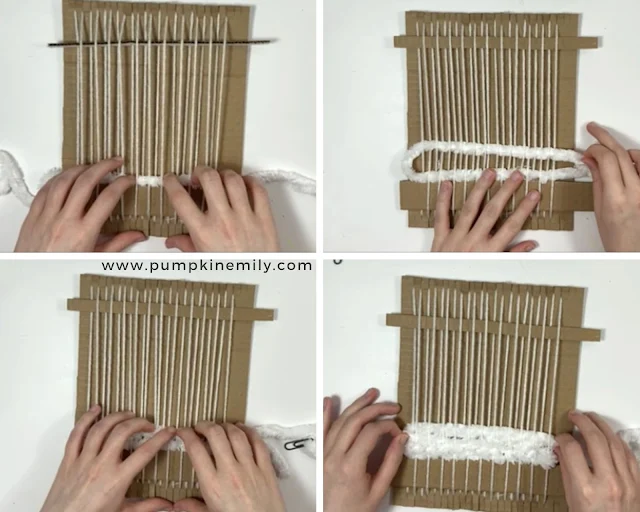
9. Weave the largest piece of cardboard you made after the loom through by going under and over until you reach the end.
10. When you're done weaving this piece of cardboard through the yarn, you want to push it to the bottom.
11. Repeat the steps 9-10 for the other piece of cardboard that is the smallest but you want to put it on the top. This piece of cardboard will be used to lift the yarn up and help you weave.
12. Cut a long piece of yarn that you would like to use on the bottom and run the end of the yarn through a paperclip.
I just estimated how long I would need this piece of yarn but when you cut yours just want to make sure it's not too long to work with.
13. Flip up the cardboard that's at the top so its standing up.

Creating The First Section
14. To create the first section you want to take your paperclip with the yarn and weave it through starting from the right by going under and over.
15. When you get to the end of the first row, you want to pull your yarn through but make sure you leave about two inches left over.
16. Push the yarn down next to the large piece of cardboard that's woven on the yarn.
17. Lay the carboard at the top back down.
18. To go back the other way you want to start weaving on the opposite side of the yarn that you ended on. For example, I ended the first row over so I went under to start creating the second row.
19. Now before you pull the yarn all the way, you want to leave a loop from the side you came from.
20. Then you can press the yarn down and if this row is to loose you can pull the yarn tighter.
21. Repeat the steps 15-20 for the rest of rows you want to create and remember this will be covered by fringe so don't make it to big.
22. When you like the height of this section, you want to cut your yarn with a about two inches left over and you'll be fixing this in the end so you can let it hang off for now or you can tape it to the cardboard to keep it out of your way.
Making The Fringe
23. To make the fringe, you want to start by taking a piece of yarn and folding it half. Then you can lay it over the yarn you already have on the loom so you can see how long you would like it to be.
24. When you have an idea of how long you would like the fringe to be, you want to cut as many pieces of yarn as you would need to create the fringe. You'll need a piece of yarn for each two strands of yarn that's on the loom.
25. When you're done cutting all of the yarn you'll need for the fringe, you want to fold one piece of yarn in half.
26. Then you want to take the loop and run it under two pieces of yarn. Then you can pull the two ends through the loop.
27. Repeat the steps 25-26 until you're done making the fringe.
28. When you're done creating the fringe, you want to push everything down so its more straight.

Making A New Section
29. To create you're next section, you want to start by cutting a long piece of yarn and running the end of the yarn through a paperclip.
30. Repeat the same weaving steps you did earlier in the first section that's under the fringe.
31. When you like the size of your new section, you want to cut off what you don't need but make sure you leave about two inches left over.

Creating Triangle Sections
32. Get your next piece of yarn ready to weave. You can either make the next color a rectangle or you can make it into a triangle. I made a triangle so you'll be learning how to make that.
33. You want to start be weaving the first row from the right and push the yarn down when you're done creating it.
34. Then you want to weave from the left but you don't want to weave on the last two rows on the right.
35. Repeat the steps 33-34 until you're done creating the triangle. Make sure you remember that each time you go from left to right you want to leave an extra two rows empty so you'll end up creating a angle for the triangle.
36. When you're done creating the triangle, you can cut off the extra yarn you don't need but make sure you leave about two inches left over and you can tape it down so its not in your way for the next sections.
37. For the next section, you can just fill it it with your next color of yarn and when you're done weaving you can cut the yarn and make sure you leave about two inches left over for later.

Creating The Last Sections
38. Now you can add any additional rows you would like. You may need to take out the piece of cardboard that you used to lift up the yarn because you may not have any more room.

Removing The Loom
39. When you're done weaving, you can pull out the piece of cardboard that's under the fringe and then you can cut the yarn that's under the fringe.
40. Then you can flip the wall hanging over but you want to keep the other end of the wall hanging on the cardboard for now. Then you want to tie the yarn you just cut into knots and you can trim the yarn you make into knots but make sure you don't cut them to short.

41. Now you can tie the extra pieces of yarn that were used to weave to another piece of yarn that was used to weave into knots or you can just weave them into the wall hanging. Then you can trim the yarn you made into knots but make sure you don't cut them to short so they don't come undone later.

42. When you're done trimming the yarn, you can carefully pull the rest of the wall hanging off the cardboard.
Fixing The Loops
44. When you're done making the loops or if you didn't have any yarn that weren't loops, you can tie every two loops together so the last section will stay together better. After I tied the loops, I trimmed the extra yarn from the loops I created.

Optional: Adding Sequins
Now if you would like you can add sequins but if you don't want to add sequins you can go onto the next step.
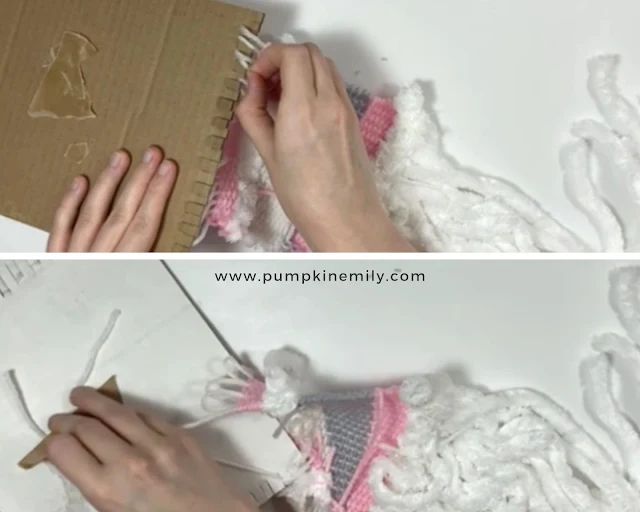
45. You want to start by laying out some sequins where you want them to go. I used silver sequins and white thread and I put the sequins over the white triangle section.
46. To sew each sequin on you want to run a needle with thread on it through the back of the wall hanging and the sequin. Then you want to go through the front of the wall hanging and next to the sequin so one side of the sequin stays down.
47. To sew the other side of the sequin down, you want to go back through the back of the wall hanging and the same sequin. Then you want to sew the other side of the sequin down by running the needle through the front of the wall hanging.
While you're sewing each sequin on make sure you're sewing the sequins around a piece of yarn so they stay on the wall hanging.
48. When you're done sewing a sequin on, you want to tie the thread into a knot on the back of the wall hanging and trim off the extra thread.
49. Repeat the same steps for the other sequins.

Finishing The Wall Hanging
50. Run a wooden dowel through the loops.
51. Take a piece of yarn and tie each end of the piece of yarn on each end of the wooden dowel to make a loop so you can hang it wherever you would like later.
52. Trim the yarn at the bottom of the wall hanging to make it more even, shorter, or you can cut it any shape. This is your last step so this will finish your wall hanging.

That's how you make a woven wall hanging!
What do you think about the wall hanging I created and will you be making one similar?
I absolutely love how it turned out and it was easy and fun to make.


Post a Comment
Hello! Thanks for your comment! I love to read your comments and I hope you enjoyed reading this post. Make sure to come back to see if I replied back and for new posts. If your comment is spam I'll most likely delete it.