

Hello! I wanted to show you how to make some dark academia inspired decorations. They're some of my favorite room decoration DIYs I have ever made and I hope these ideas give you some inspiration for your room.
The first decoration you'll learn how to make is a sign that you can put pictures on. After that DIY, I'll be showing you how to make a vintage looking worn down box and for the last DIY I'll show you a simple floral arrangement using a bottle.
Now if you would like you can watch the video below or you can read on.
Wood Sign

You will need:
Paintbrush
Nail
Ruler
Hammer
Wood Stain or acrylic paint and water
A premade wood sign or you can make one yourself.
1. Start by getting a premade wooden sign or you can make one yourself. I had a premade sign for a couple of years so I decided to use it for this DIY and the size of this sign is about about 8/12 by 10 inches.
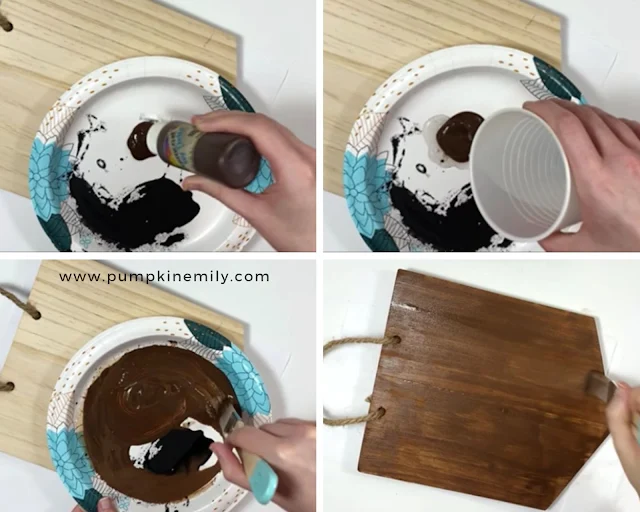
2. Stain the wood with real wood stain or you can create your own. If you're using real wood stain follow any directions on that the wood stain has before putting it on the wood. If you don't have wood stain I'll be showing how to make something similar.
To create something similar to wood stain you want to start by putting acrylic paint of any color on a paper plate. Then can put water in the paint and mix the paint and the water together until you like the consistency.
I do recommend testing the paint on the back of the sign or on a scrap piece of wood. This will help you find an idea of how it looks before painting the front and you can start with a little bit water at a time.
You want to test it after each time you add more water so you'll find out how close you are to the right consistency. The best way to explain is that the thinner the paint the more you'll see the wood underneath of the paint.
3. When you like the consistency of the paint and how it looks on the back of the sign or on a scrap piece of wood, you want to paint the sign by painting at the direction the lines are going on the wood.
4. When you're done painting the wood, you want to wait for the paint or the wood stain to dry before going onto the next step.
5. When the wood is dry, you want to take a ruler and measure where you would like to put a nail. Make sure the nail is not to long so it doesn't go through the back of the sign.
A little tip is to measure where you would like to nail to be with whatever is holding your picture such as a binder clip so then you'll know that the picture will fit where you want it too.
6. Hammer the nail in where you want the nail to be.

7. When you're done hammering the nail into the wood, you want to can take a binder clip along with a picture or whatever you would like and put it on the nail.
I decided to put a picture of some flowers on it. I took the picture a few years ago and I made the picture black and white before printing it. I made the picture black and white because I loved the look of it next to the wood.
You don't have to make a picture black and white. You can use colorful pictures instead.

Vintage/Worn Down Box

You will need:
Box
Acrylic paint
Paintbrush
A wood or cardboard shape
Hot glue
1. Start by getting a box of any shape and size.
2. Paint the box any color that you want. You'll be painting the box in a way that it will look like the box has been worn down when its done.
You'll be starting with edges and then fill the rest in. You want to move your paintbrush in circular motions close to the edges and the corners on the whole box including if it has a lid.
Make sure you don't paint the the edges completely and you'll will be going back to fix the edges to make the edges even look more worn down.

3. When you're done painting the whole box, you want to go back to clean up any of the edges and to make it look more worn down.
You want to do this by taking a partially dry paintbrush and dabbing the paintbrush on the edges and the corners. This will help make the paint fade into the uncovered spots of the box.
4. When you're done painting the box, you want to go onto the next step.

5. The next thing you want to do is that you want to paint a wood or a cardboard piece of any shape and size. I painted a wooden heart with gold acrylic paint.
6. When you're done painting you're shape, you want to wait for it and the box to dry completely before going onto the next step.
7. When the paint is completely dry, you want to put hot glue on the back your shape and put it on the the box's lid.
You can put it anywhere you would like on the lid or the box. I liked it on the middle of the lid.

When you're done attaching the shape on, you're all done with your box.
I absolutely love how it looks and I think the gold heart makes it look perfect.


Bottle Floral Arrangement

You will need:
Bottle
Fake flowers
Twine
Scissors
Wire cutters
1. Tie a bow with twine onto your bottle and if you want you can trim the ends of the bow with scissors.

2. Put fake flowers in the bottle. You may to make the stems of the flowers shorter by bending the wire a few times to break off the extra stem to make it shorter.
You can also use wire cutters to break the stems. I was actually able to use scissors to start the breaking on the plastic on the stems and then I was able to bend the stems to break them. This is because of the flower stems being thin.

Once you're done putting the flowers in the bottle you're all done with your flower arrangement.
I love how simple this decoration is. You can definitely use something different than twine to give it a different look. You could also use a jar instead.

That's how you make all three of these DIYs.
What do you think about these three dark academia decorations and which one is your favorite?
My favorite has to be the box because I love the look of it but I also love the other two decorations too.


Post a Comment
Hello! Thanks for your comment! I love to read your comments and I hope you enjoyed reading this post. Make sure to come back to see if I replied back and for new posts. If your comment is spam I'll most likely delete it.