
Showing posts with label Spring. Show all posts
Showing posts with label Spring. Show all posts
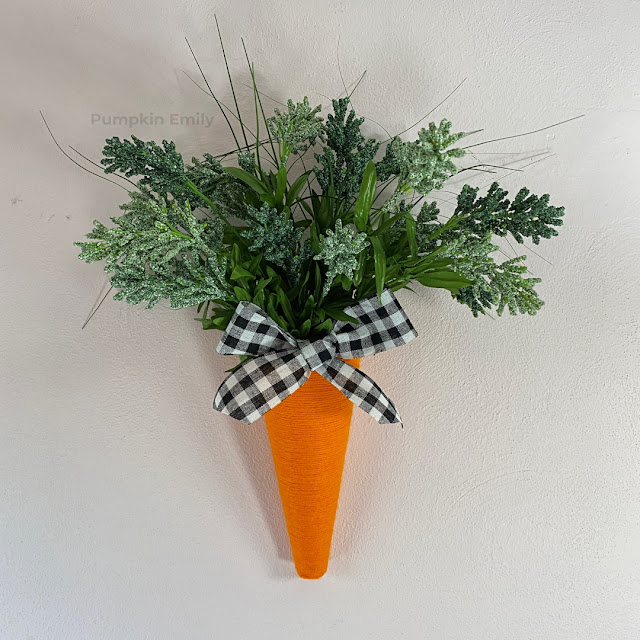

Hey there! I created a carrot wreath door hanger a few days ago and I wanted to share how you can make one too. It's easy to make and a great decoration DIY for spring or Easter!


Here you'll be learning how to make three room decorations you can do for Easter. You'll be learning how to make a bunny jar, bunny canvas art and I'll be showing you a DIY with a clear fillable egg. These Easter and spring room decorations are all really easy to make and all of the ideas look adorable.


I'm going to show how to make a bunny and pom pom garland that's ends up being a really great DIY spring room decor idea. I will also show you how to make pom poms with yarn and they are really simple DIY pom poms.
I'll be showing you how to make pom poms with your hand and it's a easy way of making pom poms. I'll also be showing you how to make the bunnies out of paper.
This DIY spring garland is great cute DIY wall decor idea and it's a perfect spring room decor idea that's works for any room.


I'm going to show you how to make garlands out of paper for spring and you will learn how to make a bunny garland and how to make a flower and bee garland. These cheap and easy wall decor ideas are perfect for some DIY spring room decor ideas for any room.


I'm going to show you how to make a photo display and it's a perfect DIY spring room decor idea for wall decor. This DIY hanging picture display is really cute and it doesn't take that long to make.
What you will need for this photo display is some pictures, a wooden stick, I used a barbecue stick but you can use any kind of stick you want, string, fake flowers, tape, scissors, wire cutters,ruler and a glue gun.

The first thing you want to do is to print out some pictures and cut them out. If you want you can cut a border around each picture.

Then you want to pull off the fake flowers from it's stems.
For the stick of the display, you want to measure how big you want the display to be and depending on the stick that you use, you can cut the stick with wire cutters, saw the stick, or you can break the stick.

After you cut the stick, you want to take three pieces of string and tie them onto the stick.
Then you want to take another piece of string and and then you want to tie one end of the string to one side of the stick and the other end of the string to the other side of the stick. This will be the hook of the display.
Now you want to lay out your pictures and the flowers onto the string to see how you want the display to look.

All you have to do now is tape the picture onto the string and put a line of glue on the back of the flowers and place the string onto the glue that's on the flower.

and that's how you make this photo display and you can hang it anywhere you want! In the comments down below let me know what you think about this photo display.


Hello everybody! Today's DIY is a ombre jar with a heart on the front of it. The jar is perfect for spring and summer. I love how both of the colors combined together.

Hello everybody! I haven't posted on here for like a month. I haven't been up to much. I just been taking pictures and I have been thinking of videos for YouTube. I have started gaming channel and I also been thing of creating kpop dance cover channel.
I was sick last month so I didn't start anything. I barfed for about five hours two weeks ago and I was sick for a whole week with nausea. But I am better now. It may have been to bad food. I don't think I could eat sweet potato again.
This is part two of the snowy pictures post from a February. These pictures are also part of the February Photo A day Month. I actually didn't do all the days but I had a couple pictures for the February. In a couple of weeks I'll be posting flower pictures.
Click here for part 1 of the snowy pictures
The snow on this Japanese Maple tree looks like a head.

This is Rocky's footprint. I took the picture back in January and it's still there.

Two pictures with Rocky's footprints in the snow.


Three pictures of snow covering tree branches of a Japanese Maple tree.


Another tree covered in snow.

Question Time!
What do think of these pictures? Which picture is your favorite?


Hello everybody! Today's DIY is a simple cute pot perfect for spring.


Hello everybody! Today's DIY is a easy frame art idea for St. Patrick's Day!
You will need...
Picture frame
Green and white cardstock
Green and gold paint
Paintbrush
Pencil
Scissors
Glue gun
1. Print out pictures or free hand the design. If you printed out the pictures trace them on to the cardstock.
2. Paint the design.
3. Cut out two or more clovers.
4. Glue the clovers on to the frame.
5. Trace the glass around the design. You can do this before making the design.
6. Place the design inside the frame and put the frame together.

If you can't see the video click here.
Questions Time!
What do you think of this DIY? What DIY should I do next?
Subscribe to:
Posts (Atom)


Social Icons